

How Dentists Fix Broken Teeth: Causes, Diagnosis, and Treatment
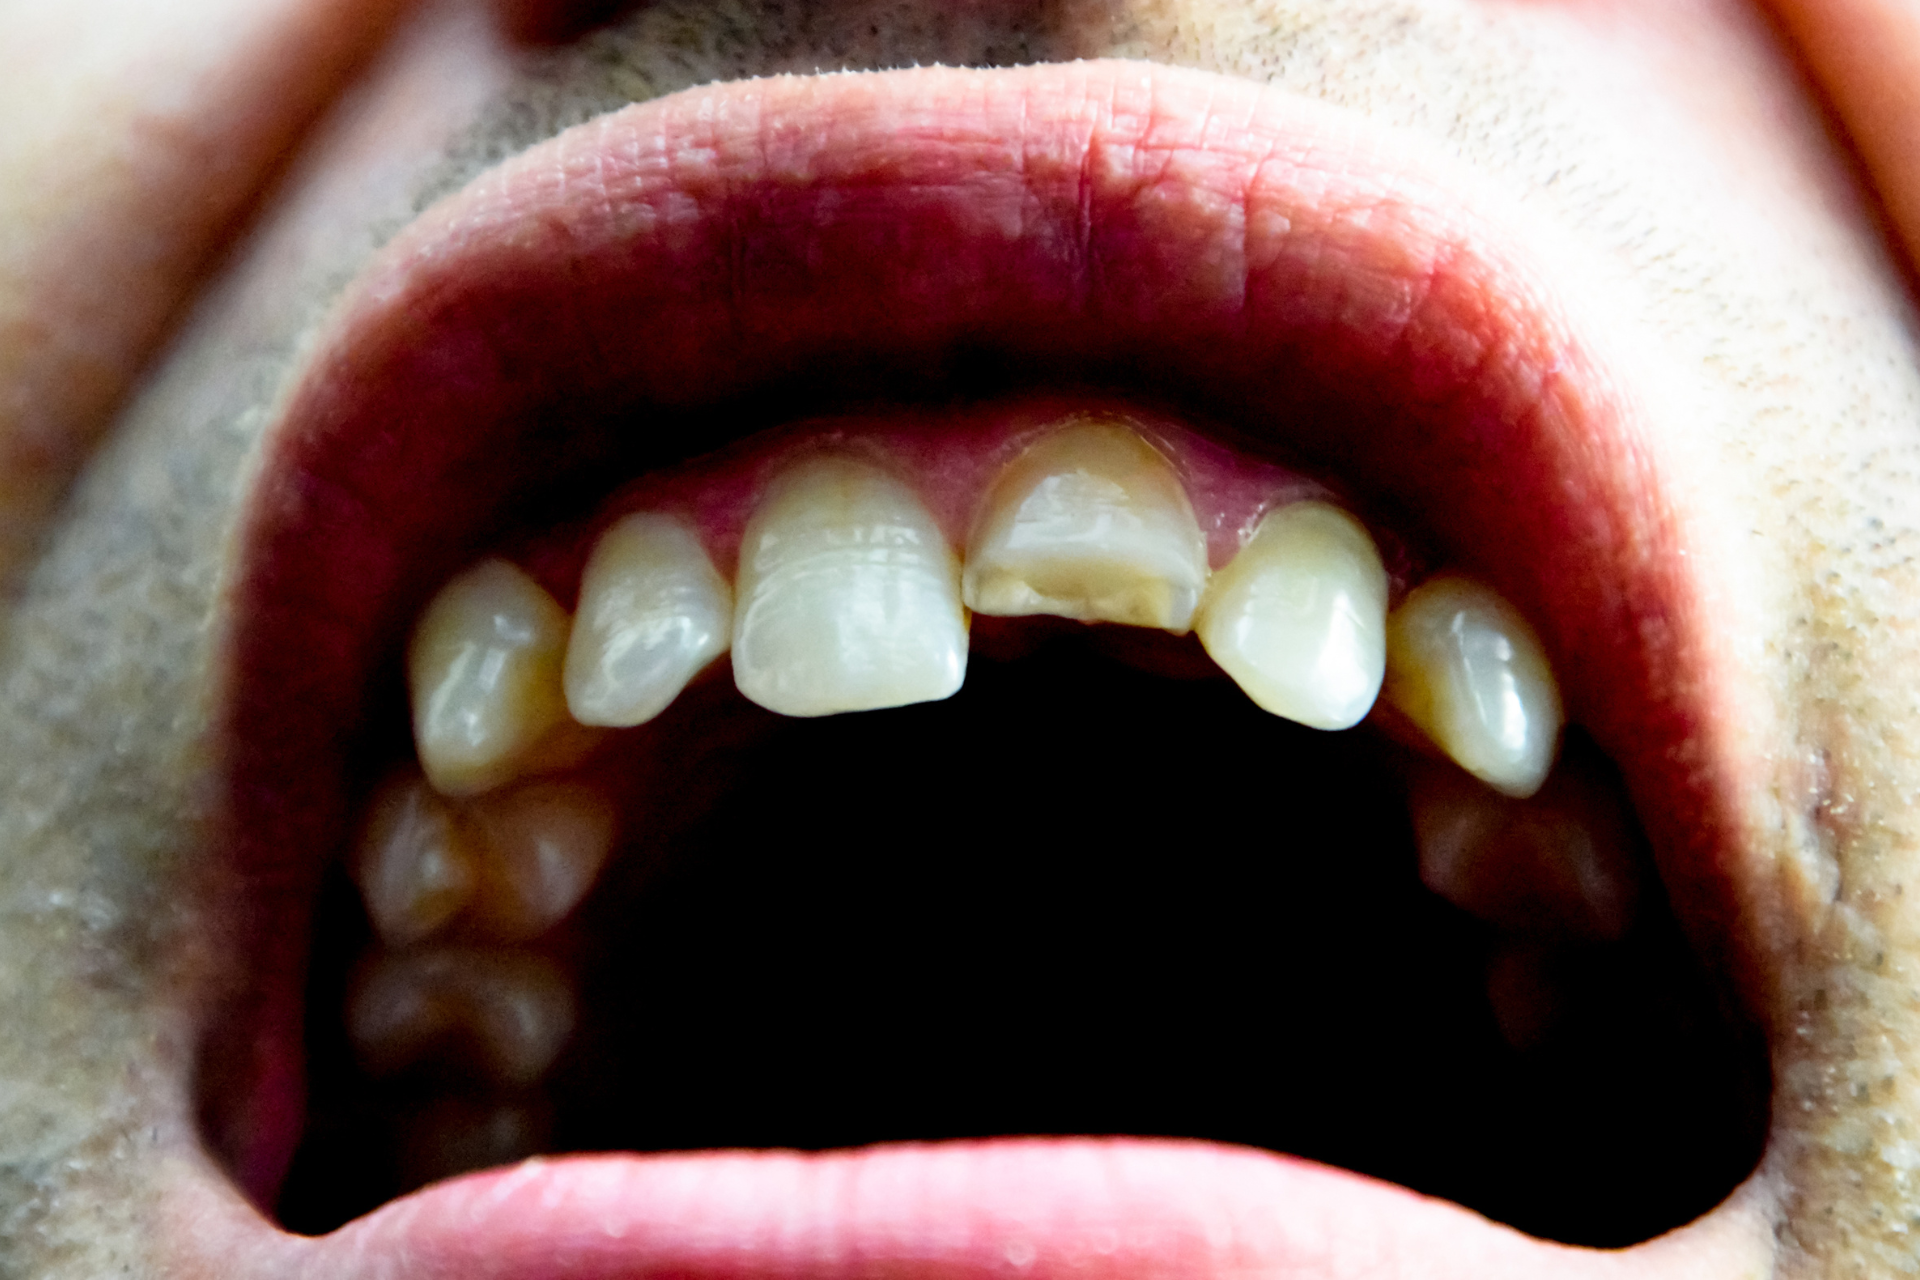
Understanding Broken Teeth
Causes of Tooth Fractures
Tooth fractures can occur for a variety of reasons, often stemming from both external and internal factors. Accidents and trauma are common external causes, where a blow to the face or a fall can result in a broken tooth. Internal factors include conditions such as bruxism, where excessive teeth grinding puts undue pressure on the teeth, leading to cracks and fractures.
Dr. Chan dentist emphasizes that poor oral hygiene and large fillings can also weaken tooth structure, making them more susceptible to fractures. Additionally, sudden changes in temperature, such as eating hot food followed by drinking cold water, can cause thermal stress and lead to tooth cracking.
- Chewing on hard objects or foods
- Age-related wear and tear
- Large cavities that undermine tooth integrity
It is crucial to identify the underlying cause of a tooth fracture to prevent further dental issues and to choose the appropriate treatment.
Types of Tooth Fractures
Tooth fractures can vary greatly in severity and type, each requiring a unique approach to repair. This is often categorizes tooth fractures into several types:
- Craze lines: These are tiny cracks that affect only the outer enamel. They are common and usually do not cause pain.
- Fractured cusp: This type of fracture typically occurs around a dental filling. It does not usually damage the pulp of the tooth and is less likely to cause pain.
- Cracked tooth: This fracture extends from the chewing surface of the tooth down towards the root. Early diagnosis is crucial to save the tooth.
- Split tooth: A split tooth is usually the result of an untreated cracked tooth. It is characterized by a crack with distinct segments that can be separated.
- Vertical root fracture: These fractures begin at the root and extend towards the chewing surface. They often show minimal symptoms until the surrounding bone and gum become infected.
Each type of fracture requires a specific treatment plan to restore both function and aesthetics to the damaged tooth. Italics are used here for illustrative purposes only.
The complexity of the fracture will dictate the treatment method. Simple fractures may only need a dental bonding procedure, while more complex cases could necessitate a crown or even root canal therapy. It is essential to consult with a dental professional to determine the best course of action for any type of tooth fracture.
Symptoms of a Broken Tooth
Identifying the symptoms of a broken tooth is crucial for timely treatment to prevent further complications. Pain is often the most immediate and noticeable symptom, varying in intensity depending on the extent of the fracture. Sensitivity to temperature changes, especially to hot or cold foods and beverages, is another common sign. Additionally, patients may experience discomfort when chewing or biting down.
It emphasizes that not all symptoms are overtly painful. Some individuals may notice:
- Swelling around the tooth or gums
- Bleeding or discharge from around a tooth
- A visible crack or chip in the tooth
- A change in bite alignment
If you suspect you have a broken tooth, it is important to seek professional dental care promptly. Ignoring the symptoms can lead to more serious issues, such as infection or tooth loss. Remember, early detection and treatment are key to preserving your dental health and avoiding more invasive procedures.
When Can I Start Eating?
Healing Process
After a tooth extraction, it is important to understand the healing process to ensure proper recovery. The healing process can vary from person to person, but on average, it takes about 7 to 10 days for the extraction site to fully heal. During this time, the body forms a blood clot in the socket where the tooth was removed, which helps protect the underlying bone and tissues.
To promote healing, it is crucial to follow the post-extraction care instructions provided by your dentist. This includes keeping the extraction site clean by gently rinsing with warm saltwater and avoiding vigorous rinsing or spitting. Dental implants may require additional care and a longer healing period.
During the healing process, it is important to avoid certain activities and foods that can interfere with the healing or cause complications. Here are some important guidelines to follow:
- Avoid using a straw, as the suction can dislodge the blood clot and delay healing.
- Do not smoke or use tobacco products, as they can impair the healing process.
- Be cautious when brushing near the extraction site to avoid irritation.
It is also important to note that the healing process can be affected by various factors, such as the complexity of the extraction, overall health, and any underlying conditions like tooth decay. If you experience excessive pain, swelling, or prolonged bleeding, it is important to contact your dentist for further evaluation and guidance.
Remember, proper healing is essential for a successful recovery after a tooth extraction.
Soft Food Diet
After a tooth extraction, it is important to follow a soft food diet to aid in the healing process. Soft foods are easier to chew and less likely to cause irritation or discomfort to the extraction site. Here are some examples of soft foods that you can include in your diet:
- Soups: Warm and comforting, soups are a great option for a soft food diet. Opt for smooth and creamy soups without any chunks or hard ingredients.
- Mashed Potatoes: Mashed potatoes are soft and easy to eat. They can be flavored with butter or gravy for added taste.
- Yogurt: Yogurt is not only soft but also provides beneficial probiotics for oral health.
It is important to avoid hard and crunchy foods during this time as they can potentially damage the extraction site or cause discomfort. Additionally, spicy and acidic foods should be avoided as they may irritate the area and delay the healing process. Sticky and chewy foods should also be avoided as they can get stuck in the extraction site and increase the risk of infection.
Remember to consult with your dentist or oral surgeon for specific dietary recommendations based on your individual case. They can provide guidance on when to transition to a regular diet and when to consider options like dental implants to replace the extracted tooth and prevent issues such as tooth decay in the future.
Transitioning to Regular Diet
After the initial healing period, which typically takes about 1-2 weeks, you can start transitioning to a regular diet. However, it's important to continue practicing caution and being mindful of your oral health. Here are some tips to help you navigate this phase:
- Gradually introduce solid foods: Start by incorporating soft, easily chewable foods into your diet, such as cooked vegetables, pasta, and tender meats. Slowly reintroduce harder foods as your mouth continues to heal.
- Avoid chewing on the extraction site: Even though the extraction site may feel better, it's still healing underneath the surface. Avoid chewing directly on the area to prevent any complications.
- Maintain good oral hygiene: Brush your teeth gently and avoid the extraction site while it's healing. Rinse your mouth with a saltwater solution or an antimicrobial mouthwash to keep the area clean and reduce the risk of infection.
- Monitor for any discomfort or complications: If you experience any pain, swelling, or other concerning symptoms, contact your dentist or oral surgeon for further guidance.
Remember, each person's healing process may vary, so it's important to follow the specific instructions provided by your dental professional. By gradually reintroducing solid foods and maintaining good oral hygiene, you can support the healing process and minimize the risk of complications such as tooth decay or infection.
Foods to Avoid
Hard and Crunchy Foods
After a tooth extraction, it is important to avoid hard and crunchy foods that can potentially damage the healing socket. These types of foods include nuts, chips, and hard candies. Tooth extraction is a common dental procedure that involves removing a tooth from its socket in the jawbone. It is often done to address issues such as tooth decay or to prepare for dental implants.
During the healing process, the socket where the tooth was extracted undergoes a series of changes to promote proper healing. Consuming hard and crunchy foods too soon can disrupt this process and increase the risk of complications.
To ensure a smooth recovery, it is recommended to stick to a soft food diet for the first few days after the extraction. This includes foods like mashed potatoes, yogurt, and soup. Gradually, as the healing progresses, you can start transitioning to a regular diet, but it is still important to avoid hard and crunchy foods until fully healed.
Remember to follow your dentist's instructions and consult with them if you have any concerns or questions.
Spicy and Acidic Foods
After tooth extraction, it is important to avoid consuming spicy and acidic foods. These types of foods can irritate the extraction site and cause discomfort. Spicy foods, such as hot peppers and spicy sauces, can also increase the risk of inflammation and infection. Acidic foods, like citrus fruits and tomatoes, can be acidic and may cause a stinging sensation or discomfort when they come into contact with the extraction site. It is best to avoid these foods until the extraction site has fully healed.
Tooth extraction is a common dental procedure that involves removing a tooth from its socket. It is often necessary due to reasons such as tooth decay, dental trauma, or the need for dental implants. After tooth extraction, it is important to follow proper post-extraction care to promote healing and prevent complications.
Here are some tips for managing the diet after tooth extraction:
- Stick to a soft food diet for the first few days, including foods like mashed potatoes, yogurt, and smoothies.
- Gradually transition to a regular diet by introducing softer solid foods like cooked vegetables and pasta.
- Avoid hard and crunchy foods that can put pressure on the extraction site.
- Maintain good oral hygiene by gently brushing your teeth and rinsing with a saltwater solution.
Remember, following a proper diet and taking care of the extraction site can help ensure a smooth recovery after tooth extraction.
Sticky and Chewy Foods
After a tooth extraction, it is important to avoid sticky and chewy foods as they can be difficult to chew and may get stuck in the extraction site. These types of foods can increase the risk of infection and delay the healing process. Tooth extraction is a common dental procedure that involves removing a tooth from its socket. It is often necessary due to tooth decay, dental implants, or other dental issues.
To ensure proper healing and minimize discomfort, it is recommended to follow a soft food diet for the first few days after the extraction. This includes foods such as mashed potatoes, yogurt, smoothies, and soups. These foods are easier to chew and swallow, reducing the strain on the extraction site.
Here are some tips for eating after a tooth extraction:
- Take small bites and chew slowly to avoid putting too much pressure on the extraction site.
- Avoid hot or cold foods as they can cause sensitivity or discomfort.
- Stay hydrated by drinking plenty of water, but avoid using a straw as it can dislodge the blood clot.
Remember, it is important to follow your dentist's instructions and gradually transition to a regular diet as the extraction site heals. If you have any concerns or questions, don't hesitate to reach out to your dentist for guidance.
Tips for Eating After Tooth Extraction
Chewing Techniques
After a tooth extraction, it is important to be mindful of your chewing techniques to avoid any complications or discomfort. Chewing on the side opposite to the extraction site can help prevent any pressure on the healing area. Additionally, it is recommended to chew slowly and carefully to avoid biting down too hard or accidentally injuring the extraction site.
To ensure proper healing and minimize the risk of complications such as infection or dry socket, it is best to avoid chewing on hard or crunchy foods for the first few days after the extraction. Instead, opt for soft and easily chewable foods that are gentle on the extraction site.
Here are some tips for chewing after tooth extraction:
- Take small bites and chew slowly
- Avoid using the extraction site for chewing
- Cut food into smaller pieces if necessary
- Be mindful of the temperature of the food to avoid sensitivity
Remember, proper chewing techniques can contribute to a smooth recovery process and help prevent any further dental issues such as tooth decay or the need for dental implants.
Temperature of Foods
After a tooth extraction, it is important to be mindful of the temperature of the foods you consume. Hot and cold foods can both have an impact on the healing process and your comfort level. Hot foods can increase blood flow to the extraction site, potentially causing more bleeding and discomfort. On the other hand, cold foods can numb the area and provide temporary relief from pain and swelling.
To ensure a smooth recovery, it is recommended to consume foods at a moderate temperature. This means avoiding extremely hot or cold foods and opting for lukewarm or room temperature options. This will help minimize any potential complications and promote healing.
Here are some tips for managing the temperature of foods after a tooth extraction:
- Avoid consuming foods that are too hot or too cold.
- Allow hot foods to cool down slightly before eating.
- Opt for lukewarm or room temperature foods.
- Use a straw to drink cold beverages without direct contact with the extraction site.
Remember, maintaining an appropriate temperature of foods can contribute to a smoother recovery process and reduce the risk of complications such as infection, dental implants failure, and tooth decay.
Hydration and Oral Hygiene
Proper hydration and good oral hygiene are crucial during the recovery period after tooth extraction. Staying hydrated helps promote healing and prevents complications such as dry socket. It is recommended to drink plenty of water throughout the day.
Maintaining good oral hygiene is essential to prevent tooth decay and maintain overall oral health. However, it is important to be gentle when brushing near the extraction site to avoid disturbing the healing process. Using a soft-bristled toothbrush and gently rinsing with an antimicrobial mouthwash can help keep the area clean.
Here are some tips to ensure proper hydration and oral hygiene during the recovery period:
- Drink plenty of water throughout the day to stay hydrated.
- Avoid using a straw as the suction can dislodge the blood clot and delay healing.
- Brush your teeth gently, avoiding the extraction site, using a soft-bristled toothbrush.
- Rinse your mouth with an antimicrobial mouthwash to help prevent infection.
Remember, following these guidelines for hydration and oral hygiene can contribute to a smooth recovery after tooth extraction.
Conclusion
In conclusion, it is important to follow proper post-extraction care to ensure a smooth healing process. Understanding the tooth extraction procedure, dietary restrictions, and managing pain and discomfort are crucial for a successful recovery. While it is natural to wonder when you can start eating after a tooth extraction, it is recommended to stick to a soft food diet initially and gradually transition to a regular diet. It is also important to avoid certain foods that can hinder the healing process. By following these tips and techniques, you can ensure a comfortable and speedy recovery after tooth extraction.
Frequently Asked Questions


Hours & Address
MONDAY: CLOSED
TUESDAY: 8 AM - 5 PM
WEDNESDAY: 8 AM - 5 PM
THURSDAY: 8 AM - 5 PM
FRIDAY: 8 AM - 3 PM
Navigation Links
Review Us
Visit Us
© 2024 Dr. Chan Dentistry || All Rights Reserved | Sitemap